
Plant Problems › Brown Spots
Brown or black spots on houseplant leaves have several possible causes: fungal or bacterial leaf spot, too much sun, cold, a watering disorder called edema, pests, and a black mold that grows on insect honeydew. Where the spots are, and what they look and feel like, are useful clues, but the look of a spot alone doesn’t confirm a cause. Keep the odds in mind, too: Clemson Extension notes that diseases are not common on most houseplants grown indoors, and that when a houseplant looks less than healthy, most often it is the result of improper care.
This guide covers spots and patches within the leaf. For brown leaf tips and edges, Clemson Extension lists hot, dry air, improper watering, insect feeding and salt buildup as causes, although some leaf spot diseases also affect the edges or tips: on some plants, bacterial lesions develop along the leaf margins (University of Maryland Extension), and anthracnose starts at the leaf tips (Clemson Extension).
Quick answer
Causes to check:
- Fungal or bacterial leaf spot: tan, brown or black spots, often with a yellow edge; bacterial spots may look water-soaked. Fix this week If tissue turns soft and mushy with a rotten smell: Act soon
- Too much sun: pale, bleached patches that turn brown and brittle, on the side facing the light. Fix this week
- Cold: leaves or spots that darken or blacken after a chill or a cold draft. Act soon
- Edema: rough, corky bumps, mostly on the undersides of the leaves. Fix this week
- Spider mites or scale: fine pale speckling (spider mites) or bumps that can be removed (scale). Act soon
- Thrips: silvery or brownish patches. Fix this week
- A black coating on top of the leaf that can be wiped off: sooty mold growing on the honeydew of sap-feeding insects. Fix this week for the coating; Act soon for the insects behind it
Also possible: fertilizer or salt buildup, prolonged dryness, viruses, spray injury, and root damage from overwatering.
Labels show how quickly to act if a cause is confirmed. They are not a diagnosis; check the signs in each section first.
Match what you see
Compare your plant with these signs, then jump to the matching section.
What you see: Roughly round tan, brown or black spots, often with a yellow edge; some show rings or tiny black dots.
Possible cause: Fungal leaf spot
Fix this week
What you see: Water-soaked or angular spots between the veins, or blotches along the leaf edge, sometimes with a yellow edge.
Possible cause: Bacterial leaf spot
Fix this week
What you see: Soft, mushy, collapsing tissue with a rotten smell.
Possible cause: Possible bacterial infection
Act soon
What you see: Large grayish to tan patches on older leaves or faded flowers, with dusty gray spores.
Possible cause: Gray mold
Fix this week
What you see: Pale, bleached patches that turn brown and brittle, on leaves facing a sunny window.
Possible cause: Too much sun
Fix this week
What you see: Leaves or spots that darken or blacken in the days after a cold night or draft.
Possible cause: Cold
Act soon
What you see: Rough, corky, tan or brown bumps, mostly on the undersides.
Possible cause: Edema
Fix this week
What you see: Fine pale speckles or stippling, sometimes with fine webbing; can look like thrips damage.
Possible cause: Spider mites
Act soon
What you see: Silvery or speckled leaves; heavily damaged leaves look brownish; can look like mite damage.
Possible cause: Thrips
Fix this week
What you see: Separate brown, white, gray or reddish bumps that can be removed; leaves may be sticky.
Possible cause: Scale insects
Act soon
What you see: A black, sooty coating on top of the leaf that can be wiped off; sticky leaves.
Possible cause: Sooty mold
Fix this week for the coating; Act soon for the insects behind it
What you see: Scorched, brown areas along the margins or between the veins; too much fertilizer or a plant kept too dry.
Possible cause: Fertilizer, salts or dryness
Fix this week
Find the cause in five checks
Work through these in order. Each one rules some causes in or out.
- Look at where the spots are. Brown or tan damage on the side of the plant facing the sun is, as Missouri Botanical Garden puts it, a good indicator of sunburn. Gray mold often begins on older leaves and faded flowers (University of Maryland Extension).
- Feel and look closely. Rough, corky bumps, mostly on the undersides, suggest edema (Clemson and Wisconsin Extension), though edema starts as small watery blisters (Wisconsin Extension) and some bacterial spots are blister-like too (University of Maryland Extension). Bumps that can be removed may be scale insects (Missouri Botanical Garden); check with a lens, since other pests can be removed too. A black coating on top of the leaf that can be wiped off points to sooty mold (Iowa State Extension).
- Look under the leaves. Clemson Extension notes that pests are most often found on the undersides, and suggests a 10X magnifying lens. To check for spider mites, Iowa State Extension suggests tapping a leaf over a sheet of paper and watching for tiny specks that move.
- Think about what changed. A move into brighter light or outdoors, a cold night or a draft, misting or splashing the leaves, or a new plant in the room can each explain a new crop of spots.
- Check the soil and roots. Overwatering can brown leaves and rot roots (Iowa State Extension), and wet soil also favors edema (Clemson Extension).
Fungal and bacterial leaf spots
How urgent: Fix this week Act sooner if tissue turns soft and mushy with a rotten smell: Act soon
Many fungi and several kinds of bacteria cause leaf spots on houseplants (University of Maryland Extension). Moisture helps them: University of Maryland Extension notes that lowering humidity, keeping leaves dry and improving air circulation all lessen the chance of infection, and Clemson Extension notes that splashing water spreads the fungi.
How to tell
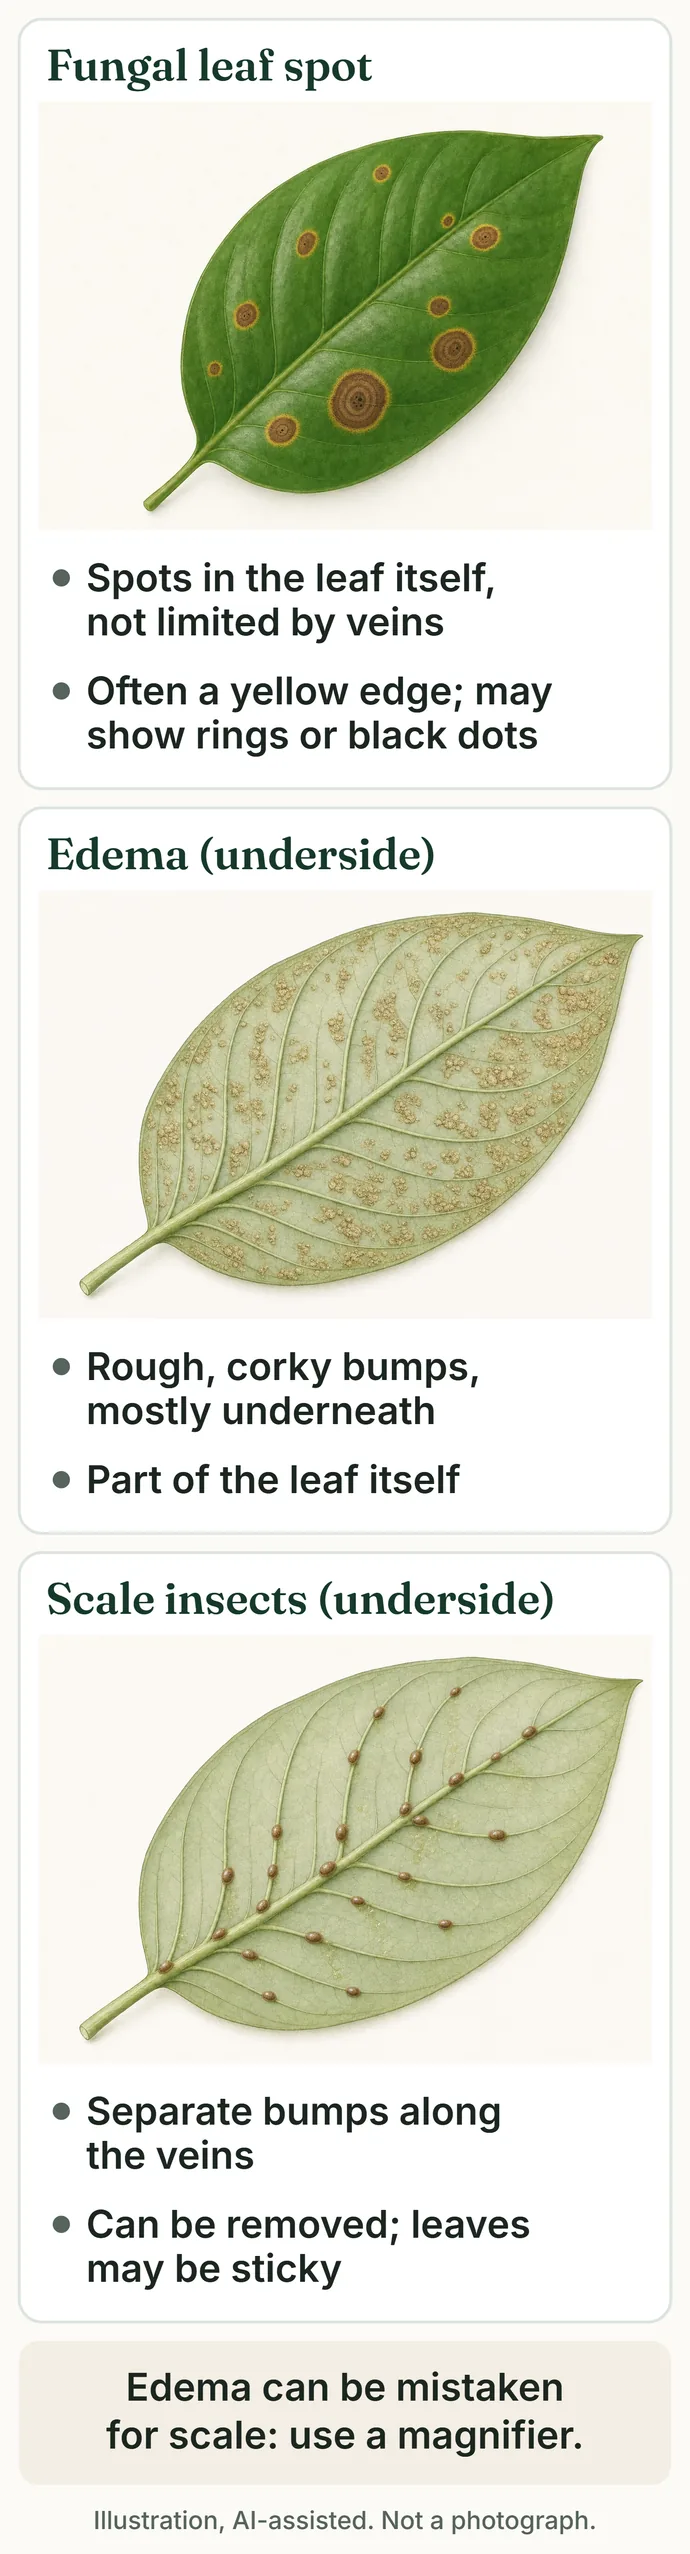
- Fungal spots: tan to reddish-brown to black, roughly circular spots that may run together into larger blotches (University of Maryland Extension). Clemson Extension describes small brown spots with yellowish margins, sometimes with a target pattern of rings, and tiny black dots, the fungus’s fruiting bodies, in the dead tissue. Penn State Extension notes that the spots aren’t limited by the leaf veins.
- Bacterial spots: black to brown, often watery spots, often between the veins, where they can look angular or V-shaped; on some plants they develop along the leaf edges (University of Maryland Extension). Clemson Extension describes water-soaked spots, sometimes with a yellow halo and a sticky ooze, that dry out and turn reddish-brown under drier conditions.
- Gray mold: large grayish to tan areas on older leaves or faded flowers, with dusty gray spores that are easy to see (University of Maryland Extension).
- Not proof on its own. University of Maryland Extension lists water spots and sunburn as well as fungi and bacteria as causes of leaf spots and blotches, so rule those out too. Wisconsin Extension notes that very few diseases can be diagnosed accurately by eye.
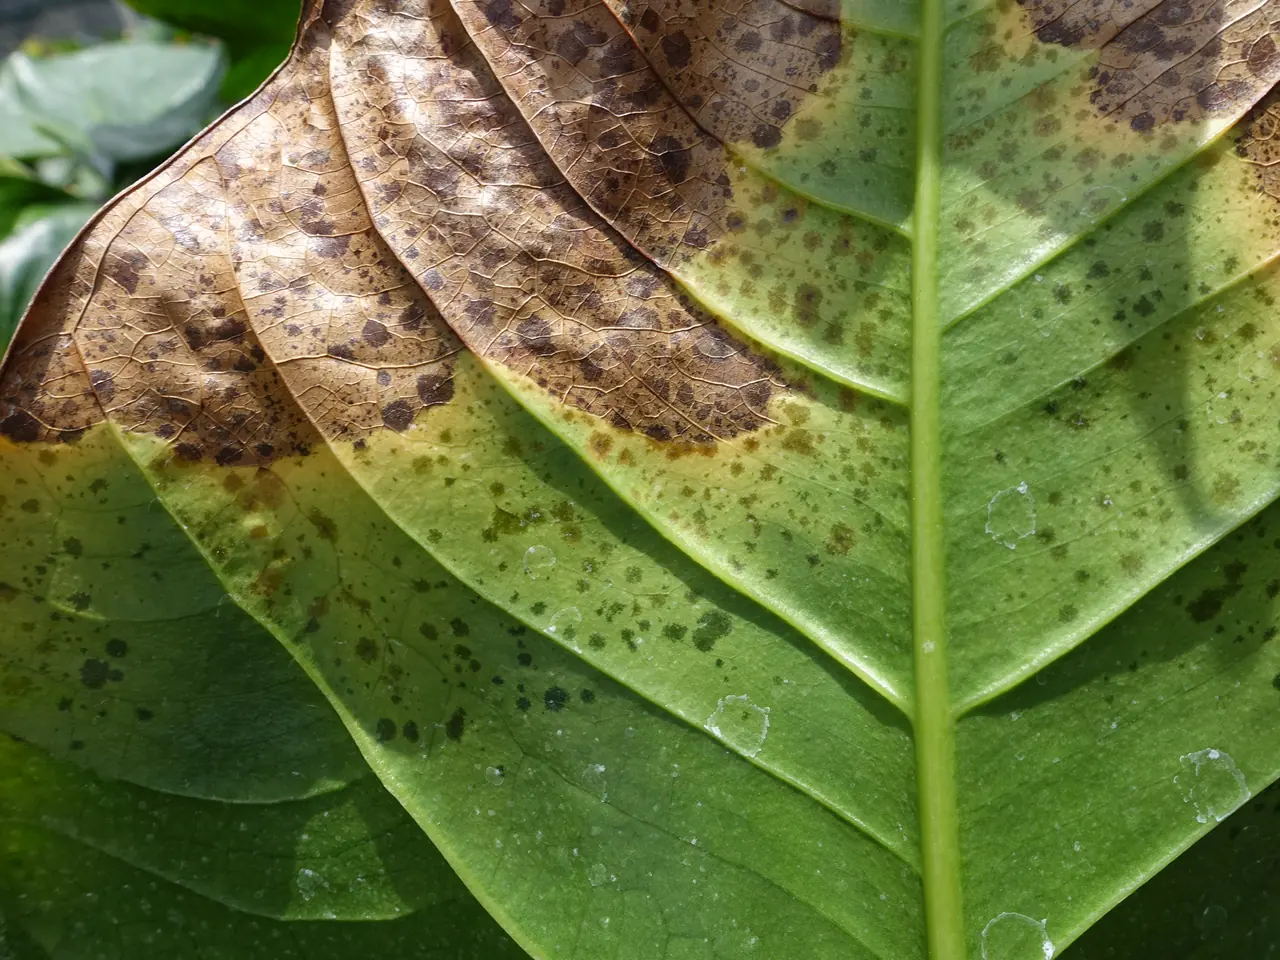
Photo: Scot Nelson, CC0, via Flickr (resized)
How to fix
- Pick off spotted leaves and destroy them (University of Maryland and Clemson Extension).
- Keep the leaves dry. University of Maryland Extension advises watering early in the day so leaves dry quickly; Clemson Extension advises against spraying or splashing water onto the foliage.
- Give plants room so air can move between them (University of Maryland Extension). For bacterial spots, Clemson Extension also advises avoiding low temperatures and crowding.
- If a bacterial infection seems to have spread through the plant, with soft, collapsing tissue or new spots appearing across it despite these steps, and the roots and stem base don’t show rot (if they do, see root damage from overwatering), discard it: University of Maryland Extension notes there is no cure for systemically infected plants, and Penn State Extension advises discarding severely affected plants.
- Treat fungicides as a last step. University of Maryland Extension notes that registered fungicides labeled for houseplants can be used, but that in most homes removing infected parts and keeping conditions drier should help. Clemson Extension lists sprays such as copper soap for use after the infected parts are removed, and suggests spraying houseplants outdoors in the shade in mild weather. Follow the label.
Prevent it
Water early in the day, keep water off the leaves, and don’t crowd plants. Penn State Extension adds clean tools and pots, good air circulation, and avoiding overwatering.
Too much sun
How urgent: Fix this week
When shade-loving plants are exposed to full sun, leaf scorch or sunburn can occur: strong sun and heat break down the chlorophyll in the leaf (University of Maryland Extension).
How to tell
- Pale, bleached or faded areas that later turn brown and brittle (University of Maryland Extension).
- Brown or tan damage on the side of the plant facing the sun. Missouri Botanical Garden calls this pattern a good indicator of sunburn.
- Damage after a move into stronger light, such as a plant moved outdoors without time to adjust (University of Maryland Extension). Symptoms are more severe when strong sun is combined with dry soil.
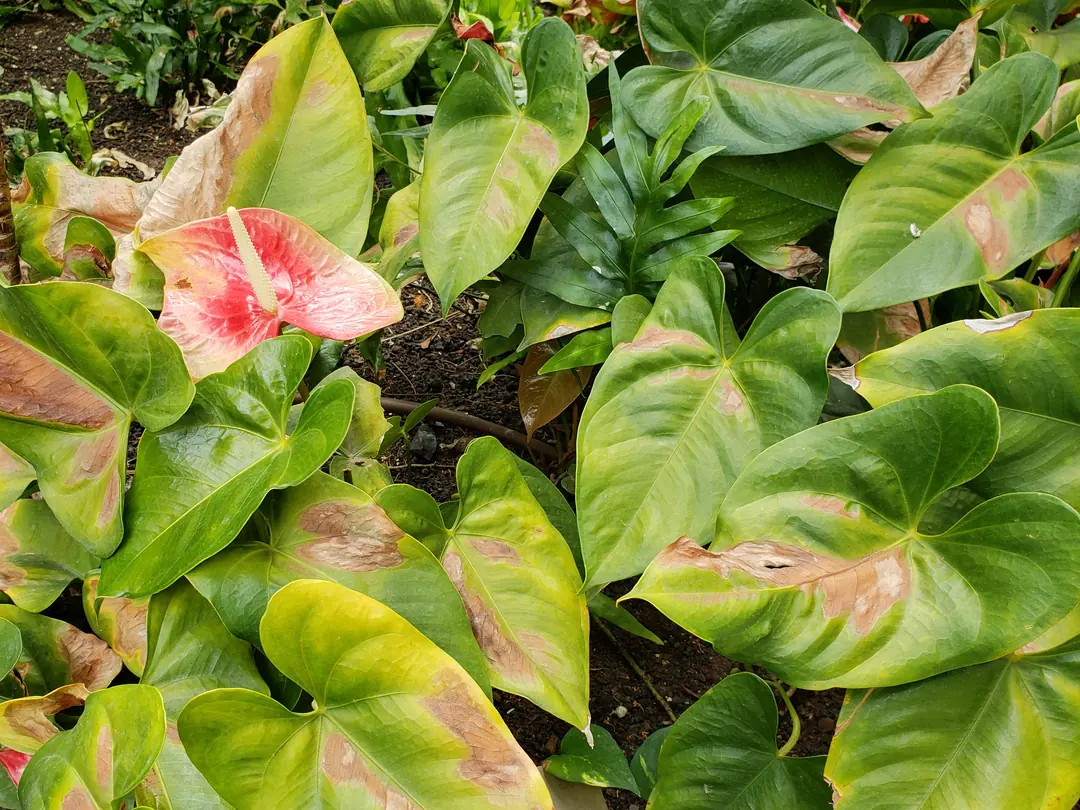
Photo: Scot Nelson, CC0, via Flickr (cropped and resized)
How to fix
- Move the plant out of direct sun (Missouri Botanical Garden).
- Remove the damaged parts. Missouri Botanical Garden notes that in many cases the plant will keep growing, though it may be stunted for a while.
- Water when the plant needs it, since dry soil makes the damage worse (University of Maryland Extension).
Prevent it
Introduce plants to stronger light slowly. For a plant moving outdoors into full sun, University of Maryland Extension suggests starting with 2 hours a day and increasing gradually. Clemson Extension advises putting houseplants that go outdoors in mostly shade at first, even those that grow well in more sun.
Cold and chilling
How urgent: Act soon
Chilling temperatures, even above freezing, can damage tropical and subtropical plants (Missouri Botanical Garden).
How to tell
- Leaves or shoots blacken after a chill. University of Maryland Extension notes that symptoms may keep appearing for up to a week after the exposure.
- Dropping, wilting or discolored leaves, or spots on the leaves, which Missouri Botanical Garden lists as possible signs of chilling injury.
- A likely source nearby, such as a draft or an air-conditioning vent. University of Maryland Extension notes that indoor plants are sensitive to drafts and advises keeping them away from heating and air-conditioning sources.
- Pale spots after watering? Clemson Extension notes that watering with cold water, or splashing water on the leaves, sometimes causes white or straw-colored spots or patches on some plants. University of Maryland Extension advises not splashing water onto fuzzy-leaved plants such as African violets.
How to fix
- Move the plant somewhere warmer right away. University of Maryland Extension advises protecting plants from temperatures below 50°F.
- Give it about a week before you judge the damage, since symptoms can keep appearing (University of Maryland Extension). If the damage isn’t severe, Missouri Botanical Garden notes that damaged foliage may be removed and the plant will survive.
- Don’t keep the soil wet while the plant recovers: Missouri Botanical Garden notes that wet soil and cold temperatures often lead to root rots.
Prevent it
Keep foliage plants within the general ranges University of Maryland Extension gives: 70–80°F during the day and 60–68°F at night, away from drafts and from heating and air-conditioning vents.
Edema (corky bumps)
How urgent: Fix this week
Edema, also spelled oedema, is a physiological disorder, not a disease: it develops when the roots take up water faster than the plant can use or lose it through the leaves (University of Maryland Extension; Missouri Botanical Garden). Wisconsin Extension notes that it frequently occurs in houseplants.
How to tell
- Small blisters on the undersides of mostly older leaves, often beginning at the edges, that burst and scar, turning tan and corky (Wisconsin Extension). Clemson Extension describes rough, corky swellings on the leaf stalks and lower leaf surfaces; University of Maryland Extension describes wart-like or crusty raised bumps that may turn brown.
- Conditions that favor it: excessive soil moisture, poor light and low temperatures (Clemson Extension), and high humidity and poor ventilation (Wisconsin Extension). Missouri Botanical Garden links it to erratic watering, and Wisconsin Extension to oil sprays that interfere with normal water loss from the leaves. Clemson Extension notes it occurs most often on succulent plants and in winter.
- Plants prone to edema include English ivy, geranium, schefflera, jade, snake plant, African violets, Pellionia and aluminum plant (University of Maryland Extension).
- It can be mistaken for disease or insect damage (University of Maryland Extension), and for scale (Missouri Botanical Garden). Scale insects are separate bumps that can be removed (Missouri Botanical Garden); edema bumps are damaged leaf tissue.
How to fix
- Water less often, and allow drying time between waterings (Clemson and University of Maryland Extension).
- Improve the light (Clemson Extension) and the air circulation around the plant (Wisconsin Extension).
- Don’t let the pot stand in a saucer of water (Clemson Extension); Wisconsin Extension suggests emptying saucers 30 minutes after watering.
- If the mix stays wet, repot to improve drainage (Clemson Extension).
Prevent it
Leaves that already show edema won’t recover, but you can halt the decline (Clemson Extension), and Wisconsin Extension notes that edema is typically not fatal. Wisconsin Extension advises watering less often in cloudy periods and under low light.
Pests: speckles, patches and bumps
How urgent: Act soon for spider mites and scale; Fix this week for thrips
Sap-feeding pests leave speckles, streaks and bumps rather than round spots. Clemson Extension notes that they are most often found on the undersides of the leaves.
Iowa State Extension advises dealing with spider mites and scale right away, before populations become unmanageable, and Clemson Extension notes that unchecked spider mites can kill the plant.
How to tell
- Spider mites: fine, light-colored speckling on the upper surface of the leaves (Clemson Extension), which Penn State Extension calls stippling, with gray or bronze discoloration and fine webbing. Iowa State Extension notes that the mottling turns tan as an infestation worsens. Spider mites thrive in hot, dry conditions (Penn State Extension).
- Thrips: silvery or speckled leaves (Clemson Extension); Missouri Botanical Garden notes that heavily infested leaves look brownish or silvery.
- Scale insects: white, brown, gray or reddish bumps on leaves and stems that can be removed, and leaves may be sticky (Missouri Botanical Garden). University of Maryland Extension notes that some scale species cause yellow spotting.
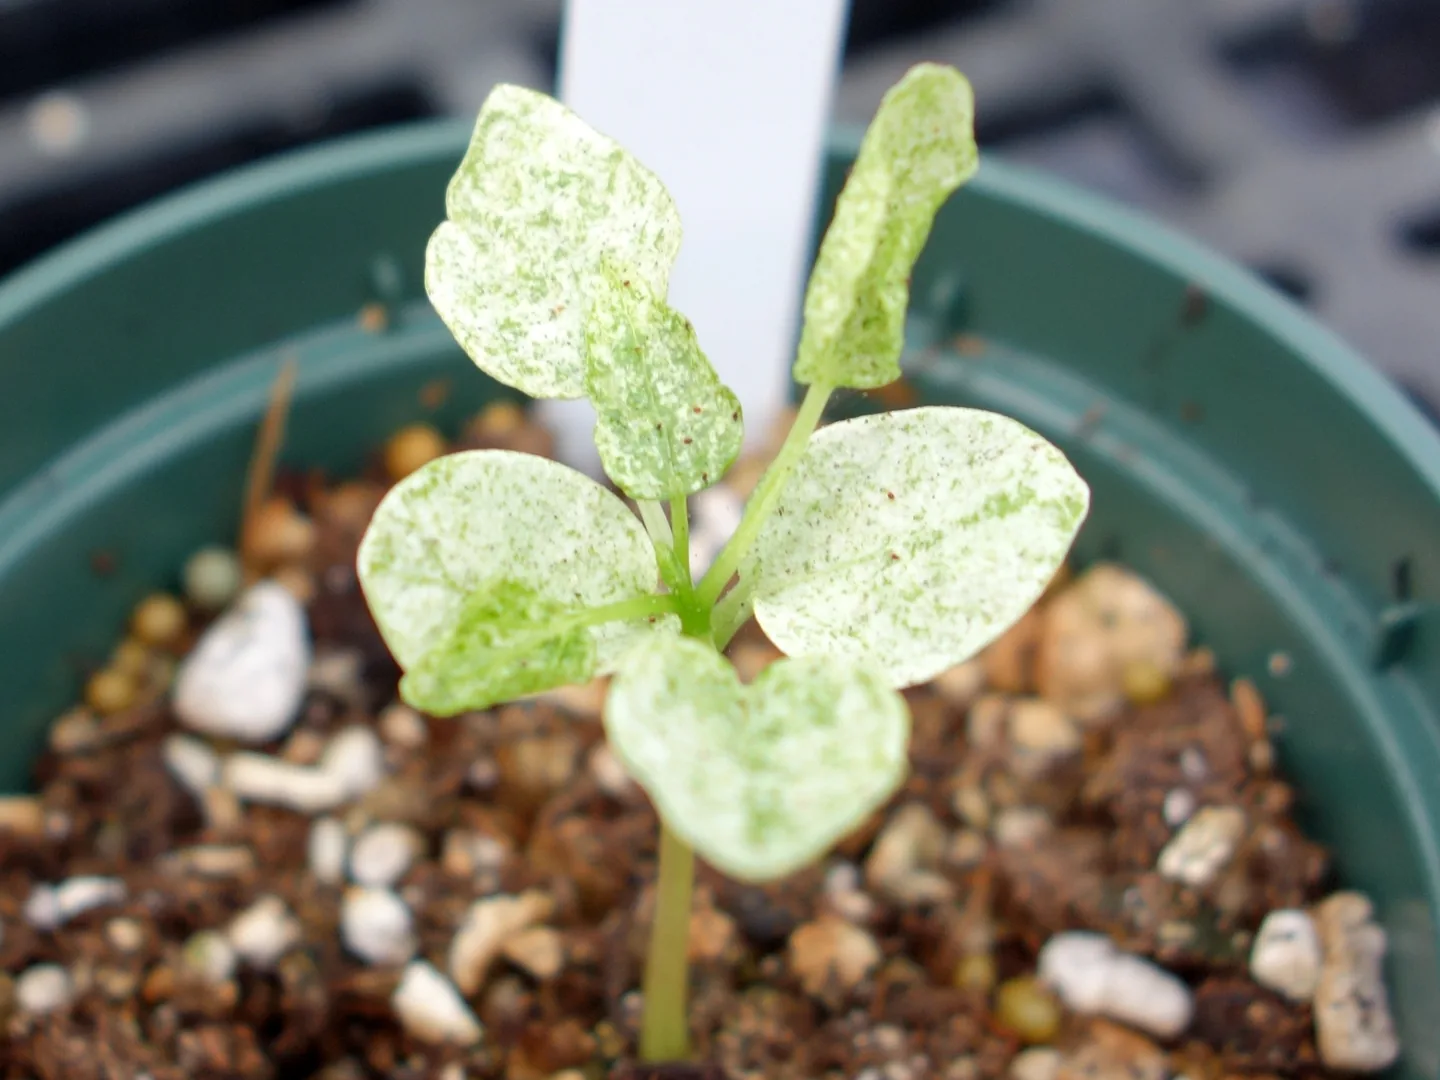
Photo: Scot Nelson, CC0, via Flickr (cropped and resized)
How to fix
- Confirm the pest first. Look for the insects or mites with a 10X lens, tap a leaf over paper and watch for moving specks, or look for webbing (Clemson and Iowa State Extension). Thrips damage can look like mite damage (Clemson Extension). Don’t use a pesticide spray until you have identified the pest (Clemson Extension).
- Keep the plant away from your others until the pest is under control (Clemson Extension).
- Rinse the leaves, including the undersides. Clemson Extension suggests spraying sturdy plants forcefully with water; Penn State Extension suggests rinsing with warm water. Don’t splash fuzzy-leaved plants such as African violets (University of Maryland Extension).
- If you find scale insects, scrape off a light infestation with a fingernail (Clemson and Iowa State Extension). Clemson Extension notes that adult scales are relatively protected from insecticides by their waxy covering.
- Discard plants that are severely damaged rather than spraying them: University of Maryland Extension notes that plants damaged by heavy feeding can be injured by insecticidal sprays.
- If you use insecticidal soap, check first that your plant can take it. Clemson Extension lists houseplants that are sensitive to it and should not be sprayed with it, including ornamental ivy, maidenhair fern, dieffenbachia, schefflera, jade plant, begonia and certain palms. On other plants, test it on a small part of the plant first and wait at least 48 hours for injury to show, and never spray it outdoors in direct sun or on a plant under drought stress (Clemson Extension). University of Maryland Extension notes that not all houseplants tolerate every pesticide, so read the label.
- Cover the undersides when you spray. Clemson Extension notes that insecticidal soap only works on contact and that more than one treatment is often needed; for spider mites, Iowa State Extension advises applications every week for 4 to 6 weeks.
Prevent it
Isolate new plants before they join your others: Penn State Extension suggests about three weeks, Clemson Extension six. Check them about once a week, paying attention to the undersides of the leaves (Clemson Extension). Washing smooth-leaved plants every two to three weeks also discourages pests (Clemson Extension).
A black coating: sooty mold
How urgent: Fix this week for the coating itself; Act soon for the insects producing the honeydew
A black, soot-like coating on top of the leaves is sooty mold: several fungi that grow on honeydew, the sugary waste of sap-feeding insects (University of Maryland Extension). It doesn’t infect the plant, but heavy growth can block light and stress or stunt it (University of Maryland Extension). The insects are the urgent part: Iowa State Extension advises dealing with scale, mealybugs, aphids and whiteflies right away, before populations become unmanageable.
How to tell
- Black, sooty deposits on top of the leaves. Iowa State Extension notes that honeydew coats lower leaves, tables and floors, and that over time the sticky deposits can turn black with sooty mold.
- Sticky leaves, tables or floors under the plant, from the honeydew (Iowa State Extension).
- Insects nearby. On houseplants, scale, mealybugs and aphids produce honeydew (Iowa State Extension), and so do whiteflies (Clemson Extension).
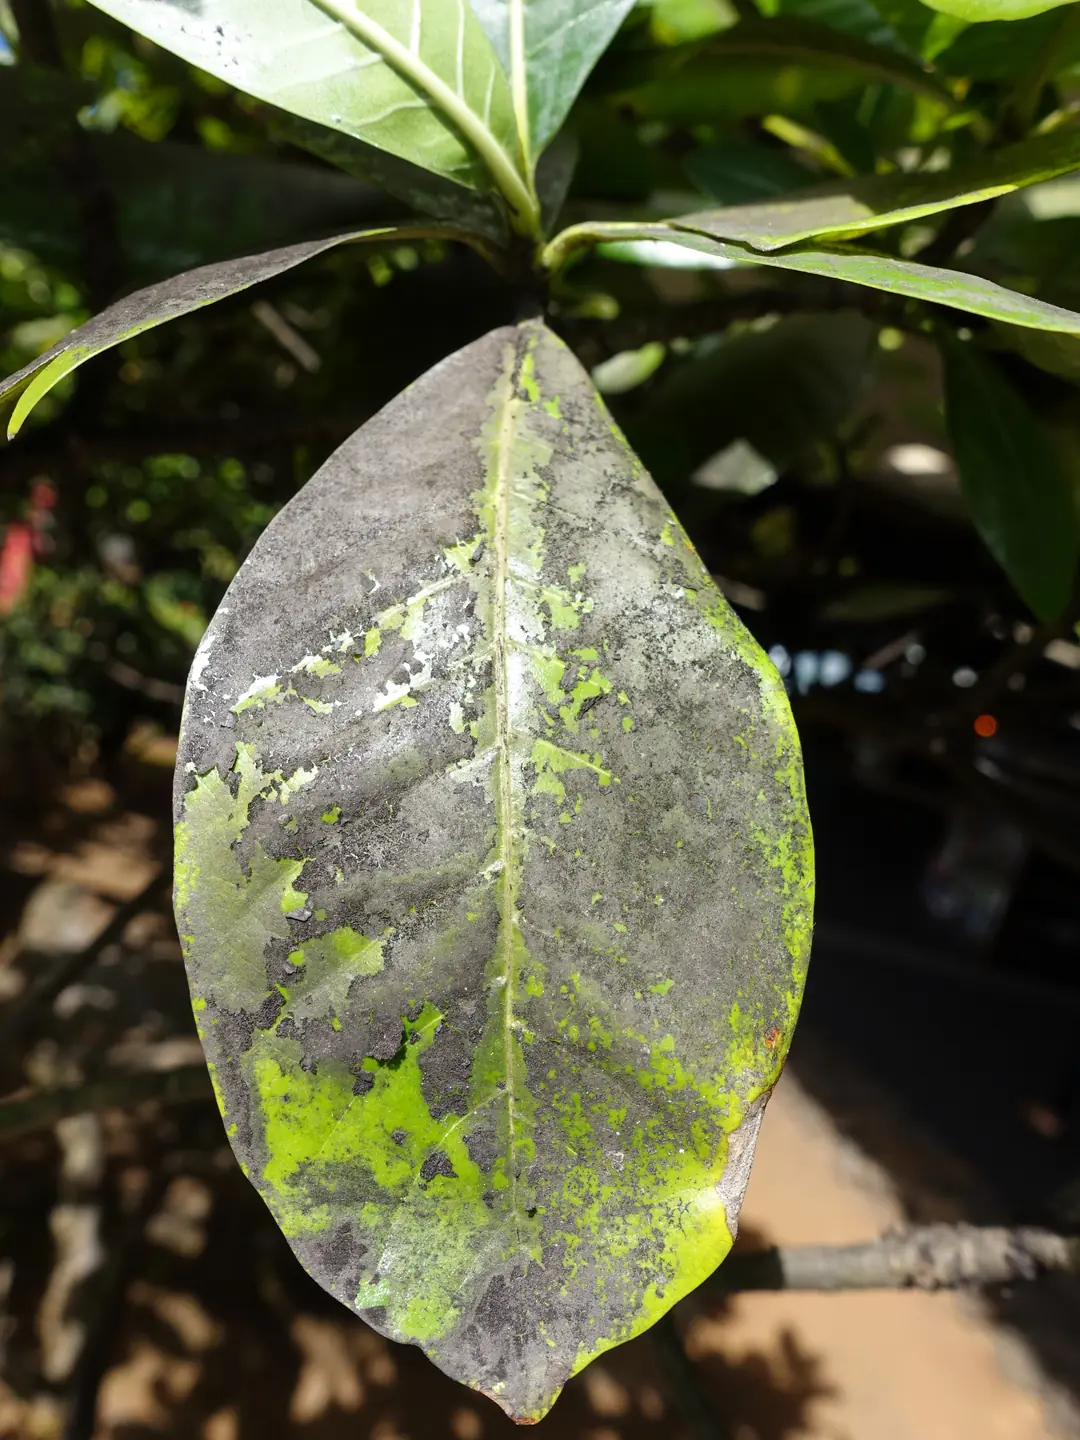
Photo: Scot Nelson, CC0, via Flickr (resized)
How to fix
- Find and control the insects; the mold depends on their honeydew (University of Maryland Extension).
- Rinse or wipe the leaves with a damp cloth to remove honeydew and sooty mold (Iowa State Extension).
- Confirm which insects are there before you treat (see pests). Remove a few scale insects or mealybugs by hand or with a cotton swab dipped in rubbing alcohol. Iowa State Extension notes that control can be difficult and lists insecticidal soap, neem, horticultural oil or pyrethrin as options; check that the label lists your plant and the pest, and test any spray on a small part of the plant first (Clemson Extension).
Prevent it
Once the insects are under control, both the honeydew and the mold wear off over time (University of Maryland Extension).
Other causes
- Viruses Act soon: University of Maryland Extension lists necrotic spots, mosaic or mottled patterns and yellow ring patterns among the symptoms, and Missouri Botanical Garden names ring spots. Similar patterns can have other causes, such as spider mite mottling (Iowa State Extension) or fungal spots with rings (Clemson Extension), and infected plants may not show obvious symptoms (University of Maryland Extension). Keep a suspected plant away from your others, since viruses spread on tools, hands and insects (University of Maryland Extension), and have the virus confirmed, for example by a plant disease diagnostic clinic, before you discard the plant. Once a virus is confirmed, there is no cure, and the plant is best discarded (Missouri Botanical Garden; University of Maryland Extension); don’t take cuttings from it.
- Fertilizer, salts or dryness Fix this week: University of Maryland Extension notes that over-fertilization, high soluble salts and lack of water can cause scorching along the leaf margins or between the veins. It advises flushing the potting mix with water or repotting in fresh mix to remove excess fertilizer; water the plant when it needs it.
- Spray injury Fix this week: Clemson Extension notes that pesticide injury can include spotting of leaves, often visible within 5 to 10 days, and that it generally doesn’t kill the plant. Check that a product’s label lists your plant before you spray.
- Root damage from overwatering Fix this week: Iowa State Extension lists yellowing or browning of leaves, leaf drop, wilting and crown rot among the symptoms of overwatering. If the soil stays wet and the leaves wilt, check the roots: University of Maryland Extension notes that healthy roots should be light-colored and firm, while diseased roots appear dark and soft. For root rot, it advises cutting out the rotten portions and replanting the healthy sections, and also suggests rooting cuttings in sterile potting mix.
When to act quickly
- Soft, mushy tissue with a rotten smell: possibly a bacterial infection. Remove the affected parts now. If the infection seems to have spread through the plant despite that, and the roots and stem base look sound, discard it; see leaf spots.
- Spots spreading to the newest leaves: University of Maryland Extension notes that when leaf spots attack the newest leaves near the top, the growing point may be killed. Remove spotted leaves and keep the foliage dry.
- Leaves blackening after cold: move the plant somewhere warmer now; see cold and chilling.
- Pests on the plant, or sticky leaves: isolate the plant now so the pests don’t reach your other plants (Clemson Extension). Iowa State Extension advises dealing with spider mites, scale, mealybugs, aphids and whiteflies right away. See pests and sooty mold.
Frequently asked questions
Should I cut off leaves with brown spots?
It depends on the cause. University of Maryland and Clemson Extension advise picking off leaves with fungal or bacterial spots, and Missouri Botanical Garden advises removing sunburned tissue. For cold damage, wait about a week, since symptoms can keep appearing (University of Maryland Extension). Leaves with edema won’t recover (Clemson Extension), so removing them is a matter of looks.
Can brown spots spread to my other plants?
Some can. Clemson Extension notes that splashing water spreads leaf spot fungi, and Penn State Extension that airborne spores spread to healthy leaves. Pests can move between plants too, which is why Clemson Extension advises isolating infested plants, and University of Maryland Extension notes that viruses spread on tools, hands and insects. Sunburn, cold damage and edema aren’t infections and don’t spread.
Do I need a fungicide?
Not as a first step. University of Maryland Extension notes that in most homes, removing infected parts and keeping conditions drier should help. Fungicides aren’t the fix for sunburn, cold damage, edema or pests, and sooty mold depends on insect honeydew, so find the cause first.
Will the brown spots go away?
Damaged tissue doesn’t turn green again: Clemson Extension notes that leaves with edema won’t recover, and University of Maryland Extension describes sun-damaged areas as turning brown and brittle. Fix the cause and judge the plant by its new growth. The exception is sooty mold, which sits on top of the leaf: it can be wiped off, and it wears off over time once the insects are controlled (University of Maryland and Iowa State Extension).
Are brown spots the same as brown tips?
Not always. University of Maryland Extension links browning of the tips and margins to too much fertilizer and high soluble salts, and Clemson Extension adds hot, dry air, improper watering and insect feeding. But some leaf spot diseases also affect the edges or tips: University of Maryland Extension notes that on some plants, bacterial lesions develop along the leaf margins, and Clemson Extension that anthracnose starts at the leaf tips.
Not sure which cause fits? Go back to the five checks and work through them in order.
Sources
- University of Maryland Extension, Home & Garden Information Center: Diagnose Indoor Plant Problems; Fungal Leaf Spots on Indoor Plants; Bacterial Leaf Spots on Indoor Plants; Gray Mold or Botrytis Blight on Indoor Plants; Excess Light on Indoor Plants; Edema on Indoor Plants; Temperature and Humidity for Indoor Plants; Fertilizer Toxicity or High Soluble Salts on Indoor Plants; Scale Insects on Indoor Plants; Honeydew and Sooty Mold; Viruses of Indoor Plants.
- Clemson Cooperative Extension, Home & Garden Information Center: Houseplant Diseases & Disorders; Common Houseplant Insects & Related Pests.
- Penn State Extension: Pest and Disease Problems of Indoor Plants.
- Iowa State University Extension and Outreach: Diagnosing Houseplant Problems Caused by Insect Pests; Diagnosing Houseplant Problems Related to Poor Culture; What is this sticky substance all over the table, floor, and lower leaves of my houseplant?.
- University of Wisconsin–Madison Extension, Wisconsin Horticulture: Edema.
- Missouri Botanical Garden: Problems Common to Many Indoor Plants.
